You may not be a professional wedding professional photographer, but there’s no reason that you can’t excellent wedding pictures. We provide wedding event photography suggestions on how to conquer the challenges you will face on the wedding day.
Professional wedding photographers can charge a little fortune for what on the surface area appears to be simply a couple of hours work.
They invest lots of more hours working on a wedding than the majority of beginners can pay for to. A lot of preparation goes into wedding photography, and numerous hours afterwards modifying images so that each photo is perfect.
Most professional photographers, eventually in their life, are asked to photograph a wedding event, be it as the main photographer or simply to record the day’s occasions.
The task can seem a bit difficult initially, but even if you are not an expert photographer, there is no reason your images can’t be as good as a pro’s.
However, there are particular mistakes and difficult areas that professionals have actually spent much of their careers finding out and preventing.
By following our guide to preventing the mistakes of wedding photography, you will have the ability to take top-class wedding images whenever the groom and bride make that demand.
Wedding photography– Payment
Although you may not be the main wedding event photographer, the happy couple may still provide you a small payment, or a minimum of cover your expenditures. Lots of unofficial wedding professional photographers offer to take the images as their gift to the couple.
Whatever you have decided, it is best to make certain that all the needed plans are figured out with the couple beforehand. This ensures that everybody knows exactly what the offer is and avoids any unnecessary issues and confusion after the event.
Wedding event photography– Preparation
Professional wedding photographers invest a lot of time preparing for the big day and there are a number of tips that you can learn from them.
1. Speak with the couple about the kind of images they desire.
2. Find out if there are any particular family or friends who need to be photographed and make a list of these people.
3. If possible, go to the place beforehand to scout for places to take pictures.
4. Attempt and speak to individuals hosting the ceremony to discover whether they have any limitations on photography. Some locations will not enable you to use flash throughout the service itself.
5. Take a look at the seating strategy and make sure that you have kept in mind where all of the essential visitors are sitting.
Wedding photography– Equipment preparation
Besides the apparent electronic camera and lenses there are other products that are a need to for wedding event photography. If you are taking a landscape image and you have actually forgotten something, or the image hasn’t turned out quite how you want, you can always return and re-photograph it on a different day. A wedding is a one-off occasion, so it is essential to make sure you are covered for any possibility.
1. It’s important to bring spare batteries for both your electronic camera and flashguns. Remember to make certain that they are totally charged.
2. Take as numerous memory cards as you have available
3. Format sd card rather than just erasing all of the images. This assists avoid them ending up being corrupted
4. Tidy all of your lenses and your electronic camera’s image sensing unit ahead of time, and take a lens cleansing cloth with you
5. Take a grey card and a white balance card to guarantee that you get great exposures and that the bride-to-be’s gown comes out the correct colour.
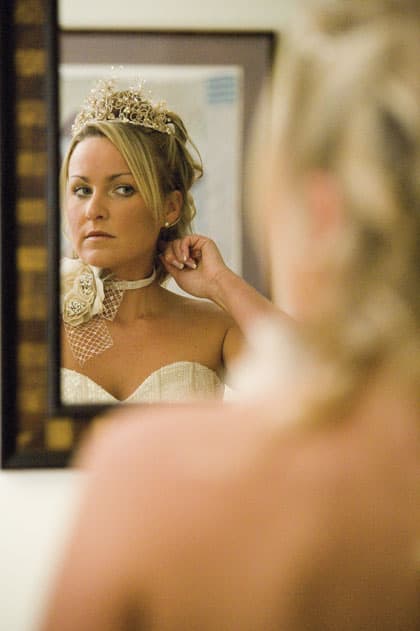
Wedding event photography– Using flash
A lot of weddings occur in summertime, and in strong sun, so images taken outside can suffer extreme shadows.
Shooting with your subjects facing the sun might cause them to squint their eyes, producing uncomplimentary facial expressions. However, having the sun behind them can create similarly troublesome backlighting, as the brilliant light can deceive a camera’s metering system, causing incorrect direct exposures.
Fill-in flash can assist soften shadows triggered by intense sun and can add light to the front of a backlit image.
Even the fairly weak power of a video camera’s integrated flash can be ideal for fill-in flash at close range. For a slightly better effect, use an off-camera flash bracket, or wireless flash mounted on a stand or tripod. While a fancy set-up is unwise for documentary-style images, it may work for group shots.
Another suggestion is to avoid the bright sunshine altogether by shooting in a somewhat shaded location, utilizing a tip of flash to brighten the subjects’ faces.
When shooting inside, flash is nearly vital, even where there is bright natural light. If individuals you are photographing are offering speeches or cutting a wedding cake, in front of a window, then fill-in flash can assist level the backlit scene.

Image: Fill-in flash is necessary if a scene is backlit
To avoid the harsh shadows triggered by an on-camera flash weapon attempt angling the flash head and bouncing the light off of the ceiling. The light will show down on to the subject, which is more natural and less severe than using direct flash.
If the ceiling is expensive for this to work, try a diffuser, such as the Sto-Fen Omni Bounce, or attempt attaching a bounce card to your flashgun. These soften the extreme direct light from the flash, and can be used inside and out.
Needs to your flash stop working, or if it doesn’t recycle its charge in time, you can use Adobe Camera Raw’s Fill Light function to lighten up shadows.

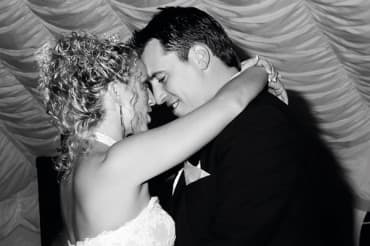
Wedding photography: The very first dance
The very first dance is among the trickiest moments to catch. There is usually little light, and it can be difficult to stimulate any atmosphere.
Utilizing direct flash can kill what environment there is, as will bouncing it, as it can flatten the last image.
One way to get a nice image is to close in on the faces of the groom and bride, as they will enjoy and laughing or in a welcome.
Better yet, utilize a slow-sync flash strategy to catch a few of the movement of the dance.
Handhold the camera and set the exposure so the shutter speed is around 1/30sec or less, therefore that the image is underexposed by around 1EV.
With the flash set to rear drape, utilize the flash to freeze the movement of the bride and groom.
The ambient light will trigger a slight blur as the couple dance, producing a sense of movement, however with faces of the groom and bride remaing sharp.
Wedding event photography: Confetti
Among the timeless wedding event shots is the throwing of the confetti Yet it can be rather a difficult shot to get right. We have discovered that the best shots can be found when taking a slightly alternative angle of the scene.
Attempt bending down and soaring towards the groom and bride’ faces to reveal the confetti falling. Take a greater vantage point and try to record the crowd of confetti-throwing visitors.
Most of time the situation is completely out of the hands of the photographer. One little idea is to ask everybody to toss the confetti on the count of three. However, confetti can wind up obscuring the bride and groom’s faces, or the sun can cast shadows from the confetti across them. You can attempt to reduce this by using a soft fill-in flash method, however if you set the flash too high it will itself trigger extreme shadows.
Often the bride and grooms’ finest facial expressions come simply after the majority of the confetti has been thrown; their faces will be less obscured and they will not be squinting attempting to avoid getting confetti in their eyes and mouth. The obvious problem with this is that there will now be little confetti in the image. The good news is, you can add it in utilizing image-editing software.
Include more confetti.

Include more confetti– before and after

Step 1. Select the Marquee tool and produce a selection around a single piece of confetti. Select more random pieces by holding the shift when you make the next choice.

Select Layer > New > Layer via Copy, which copies the picked pieces of the confetti to a brand-new layer. Now choose the original background layer once again and repeat action 1, this time choosing different random pieces of confetti.

Action 3. Once again copy the chosen confetti to a variety of new layers. Now, choose each layer in turn, and utilize the Move tool to move the confetti around the image to make it look as if more was thrown. Attempt to differ how far you move each layer to avoid repetitive patterns.